Saturday, October 19, 2013

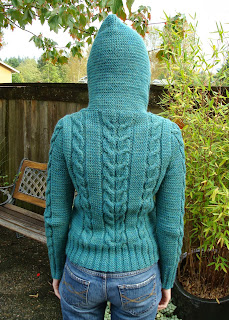
Lake Chelan Central Park Hoodie

If you knit I think it’s almost required to make a Central Park Hoodie (CPH) at some point.  Naturally as I’ve taken up knitting in the past year I dutifully put it in my Ravelry queue and then went ahead and made one.  Now that it’s finally done I’m really glad I did.
Right off the bat the eagle eyed out there may notice that mine looks a little… wrong different than the small army of CPHs out there.  That’s because I completely spaced on how to knit and totally did it wrong – apparently I knitted into the back of the stitches.  My purling ability stayed the same resulting in nonstockinette stitch.
 
But like I remember my mom saying way before I learned to knit: if you’re consistent it’s not a mistake, it’s part of the design.  And I was very consistent.
I knitted this up with Cascade Yarn 220 Heather in the Lake Chelan colorway which is a bluish green with yellow flecks.  I liked using yarn from a local company (they’re located in Seattle) and have fond memories of vacationing on Lake Chelan as a kid.
There’s not much to say about this pattern that a thousand Ravelry members haven’t already.  I ended up knitting the body in one piece to try something new and avoid sewing up the side seams.
I waited to get some help from my mom picking up stitches for the hood and ribbing since I’ve never done it before.
I was looking forward to relearn how to properly knit before starting sweater #2 but wanted to wait until this one was finished.
I love these silver buttons I found during a ½ off sale.  I used the yarn separated into 2 ply to sew on the buttons using a long strand of yarn that is worked from button to button along where the stitches were picked up.  This technique is from Finishing School: AMaster Class for Knitters which includes tons of information on all sorts of finishes.  Not that the lack of buttons stopped me from wearing it.
Now that it’s officially sweater season here in Seattle this hoodie is warm and cozy and will get lots of wear. I’m really excited about finishing my first sweater and have already started on another.

Friday, October 18, 2013

Floral Origami Dress

 I can’t believe how long it’s been since I posted anything.  This is completely due to a lack of me taking photos.  And let's face it: a sewing blog is very, very dull without them.  However I have been sewing!

 This is Simplicity 1877, one of Leanne Marshall’s patterns, and I made version B with the gathered skirt.  I don’t wear a lot of florals but felt like expanding my sewing horizons and loved this lightweight linen I found at Jo-Ann’s.  I felt the colors would transition nicely from late summer into fall with tights and boots.  The pattern went together pretty easily although I complicated things by adding a full lining and then went completely mental and hemmed the skirt by hand.

Hidden pinked center seams
I prefer to line my dresses anyways, but I wasn’t thrilled with the center bodice seam remaining unfinished.  Plus my fabric was a bit sheer.  In order to add the lining I sacrificed the bias binding around the neck and sleeves.  Instead I under stitched and then top stitched ¼” around the edges to try and simulate the look.
Shoulder flounces before being tacked down

  The edges of the “V” in front aren’t perfect but I figured it was good enough since me and my cleavage have the best views and I’m counting on them distracting anyone looking to closely at my seams.
FYI: while this pattern is low cut, it’s not drafted to be quite this low.  When I went to sew my fabric and lining together I went ahead and used a standard 5/8” seam, completely forgetting that the bias binding finish means the edges wouldn’t be reduced at all until after I serged them.  Whoops!  This also meant the armhole was lowered as well but for the most part doesn’t reveal my bra. 
Crazy hair mustache
 Except in this photo where I realized I totally made a dress that matches my bra!
 I debated whether or not to add the shoulder flounces before deciding why not since I don’t have anything else like it in my closet.  Plus they reminded me of origami for some reason.
The skirt is pleated and topstitched in the center and gathered everywhere else.  To keep my lining simple I just used the skirt pieces and made it exactly the same other than shortening it a few inches.


The end result is a nice clean inside and added opaqueness.  Next time I make this dress I’ll raise the underarm slightly and take it in about ½” at the waist.  Although the design is pretty distinctive so that won’t be anytime too soon. 
I braved the cold to take these photos but I’m hoping for a warmish fall day to wear it without tights.  I think with my brown leather jacket, tights and boots it’ll be perfect to wear out while the leaves are changing colors.  I doubt it’ll stay in the rotation throughout winter so I plan on wearing it while I can!